Golf enthusiasts understand the importance of maintaining their equipment, and shoes are no exception. The condition of your golf shoes can significantly affect your performance on the course. One crucial maintenance task is the removal and replacement of golf shoe spikes. Whether you’re a weekend golfer or a pro on tour, knowing how to remove golf shoe spikes is essential for ensuring optimal traction and stability. In this comprehensive guide on How to Remove Golf Shoe Spikes, we’ll guide you through every step, from identifying your spike type to sharing tips and tricks for maintaining your golf shoes. We’ve tailored this guide for golf enthusiasts, amateur players, and professional golfers. With our step-by-step instructions, you’ll have your golf shoes in top shape in no time.
Key Takeaways
- Removing and replacing golf shoe spikes is a straightforward process that can enhance your performance on the course.
- Using the right tools and techniques can save you time and effort.
- Regular maintenance of your golf shoes ensures longevity and optimal performance.
Tools Needed for Removing Golf Shoe Spikes
Before you start the process of removing your golf shoe spikes, it’s important to gather the necessary tools. Having the right equipment will make the task much easier and more efficient.
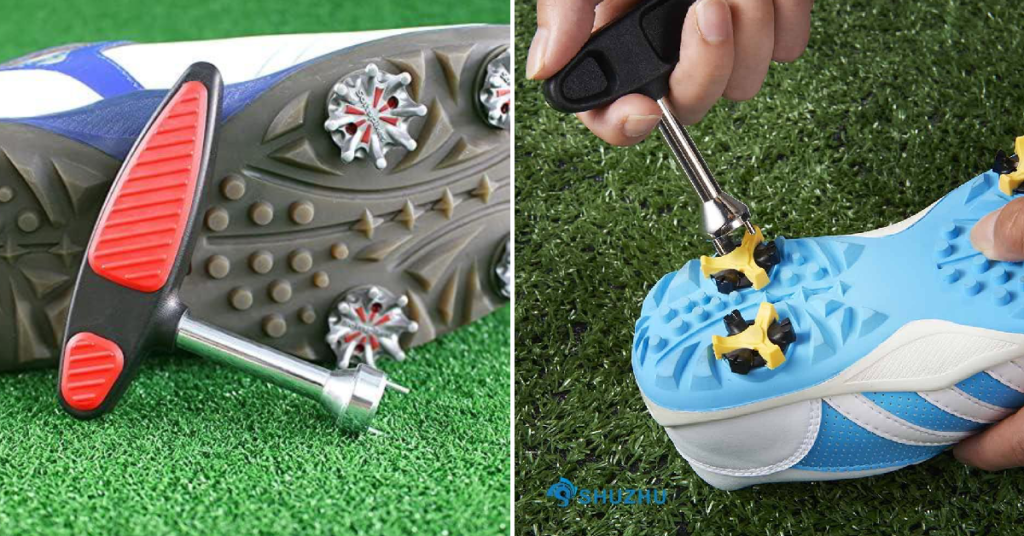
Spike Wrench: A spike wrench is a specialized tool designed for loosening and removing golf shoe spikes. It typically has prongs that fit into the holes or slots on the spikes, allowing you to turn and remove them easily. Make sure to use a wrench compatible with your specific spike type.
Replacement Spikes: When you remove old spikes, you’ll need new ones to replace them. Ensure you have the correct type and size of replacement spikes for your golf shoes. Check your shoe’s specifications or consult the manufacturer if you’re unsure.
Cleaning Brush: A small brush is useful for cleaning dirt and debris from the spike holes before installing new spikes. This ensures a secure fit for the new spikes and improves their performance.
Lubricant: Sometimes, spikes can become stuck due to dirt, rust, or wear. A small amount of lubricant can help loosen stubborn spikes, making them easier to remove.
Step-by-Step Guide to Removing Golf Shoe Spikes
Now that you have your tools ready, let’s walk through the process of removing golf shoe spikes. Follow these steps carefully to ensure a smooth and successful spike removal.
Identifying the Type of Spikes on Your Golf Shoes
Before you can remove your golf shoe spikes, you need to identify the type of spikes your shoes have. Golf shoes typically come with two types of spikes: metal and plastic. Metal spikes are more durable but can cause more damage to greens, while plastic spikes are softer and less likely to damage the course. Check your shoe’s documentation or look at the spikes themselves to determine the type. Knowing this will help you choose the right tools and replacement spikes.
Using a Spike Wrench to Loosen and Remove the Spikes
Once you’ve identified your spike type, it’s time to use the spike wrench. Insert the prongs of the wrench into the holes or slots on the spike. Turn the wrench counterclockwise to loosen the spike. If the spike is not budging, don’t force it. Apply steady pressure until the spike begins to turn. After loosening, continue turning the wrench until the spike comes out. Repeat this process for all spikes on both shoes.
Removing Stubborn or Worn-Out Spikes
Occasionally, you may encounter spikes that are difficult to remove due to wear or debris. If a spike is stuck, try the following methods:
- Apply a small amount of lubricant around the base of the spike. Allow it to sit for a few minutes to penetrate and loosen the spike.
- Use a pair of pliers to grip and twist the spike if the wrench fails.
- Gently tap around the spike with a rubber mallet to break up any debris holding it in place.
Cleaning the Spike Holes Before Installing New Spikes
With the old spikes removed, it’s crucial to clean the spike holes thoroughly. Use a small brush to remove dirt, grass, and debris from each hole. This step ensures that the new spikes will fit securely and function correctly. If necessary, use a damp cloth to wipe away any remaining dirt. Allow the spike holes to dry completely before proceeding to the next step.
Installing New Spikes After Removal
Now that the spike holes are clean, you can install the new spikes. Align the prongs of the new spike with the holes in the shoe’s sole. Press the spike firmly into place and use the spike wrench to turn it clockwise, tightening it until it’s secure. Repeat this process for all spike holes. Ensure that each spike is securely fastened to prevent any loosening during play.
Common Mistakes to Avoid When Removing Golf Shoe Spikes
- Using the wrong type of spike wrench: As mentioned before, different spikes may require different tools. Always use a compatible spike wrench to avoid damaging your shoes.
- Forcing stubborn spikes: If a spike is not budging, do not apply too much force. This can damage the shoe or cause injury.
- Not cleaning the spike holes: Neglecting to clean the spike holes before installing new spikes can result in an insecure fit and reduced performance.
Tips and Tricks for Maintaining Golf Shoe Spikes
Proper maintenance of your golf shoe spikes can extend their lifespan and improve your performance on the course. Here are some useful tips and tricks for keeping your spikes in optimal condition:
- Regular Inspection: Regularly inspect your golf shoe spikes for signs of wear or damage. Check for any spikes that appear worn down, cracked, or loose. Replacing damaged spikes promptly ensures that you maintain optimal traction and stability.
- Cleaning After Every Round: After each round of golf, take a few minutes to clean your spikes. Use a brush to remove dirt, grass, and debris from the spikes and spike holes. This simple routine prevents buildup and keeps your spikes in good condition.
- Rotating Spikes: To ensure even wear, consider rotating the position of your spikes periodically. This prevents certain spikes from wearing out faster than others and helps maintain consistent traction across your shoes.
- Storing Shoes Properly: When not in use, store your golf shoes in a cool, dry place. Avoid leaving them in direct sunlight or extreme temperatures, as this can cause the materials to deteriorate. Keeping your shoes in good condition extends the life of the spikes.
- Using Spike-Friendly Surfaces: Whenever possible, avoid walking on hard surfaces like concrete or asphalt with your golf shoes. These surfaces can cause excessive wear on the spikes. Stick to grass or other soft surfaces to prolong the life of your spikes.
For more tips on caring for your golf shoes, check out our guide on how to care for leather golf shoes.
FAQs about Removing Golf Shoe Spikes
How often should I replace my golf shoe spikes?
It’s recommended to replace your golf shoe spikes every 15-20 rounds of golf, or when they show signs of significant wear or damage.
Can I use the same spike wrench for different types of spikes?
No, different types of spikes may require different tools. Always use a compatible spike wrench for your specific type of spike.
Can I remove and install new spikes myself, or do I need professional help?
With the right tools and instructions, you can easily remove and install new spikes yourself. However, if you’re unsure or uncomfortable with the process, it’s always best to seek professional help.
Can golf spikes be removed?
Yes, golf spikes can be removed and replaced. It’s a simple process that requires the use of a spike wrench and some basic knowledge of your shoe’s spike type. Regularly replacing worn or damaged spikes can improve your performance on the course and extend the life of your golf shoes.
Can you remove cleats from shoes?
Yes, cleats can be removed from shoes. However, unlike golf spikes, cleats may require more specialized tools and techniques for removal. It’s always best to consult the manufacturer or seek professional help when removing cleats from shoes.
For more information on golf shoe maintenance, you might find our article on how to change spikes on golf shoes helpful.
Conclusion
Removing and replacing golf shoe spikes is a straightforward process that can significantly impact your performance on the course. By following the steps outlined in this guide, you’ll ensure that your golf shoes provide the traction and stability you need for optimal play. Remember to regularly inspect and maintain your spikes, clean them after each round, and store your shoes properly. These simple practices will keep your golf shoes in great condition and help you perform your best on the course. For more tips and expert advice on golf equipment maintenance, be sure to explore our other articles and resources.
